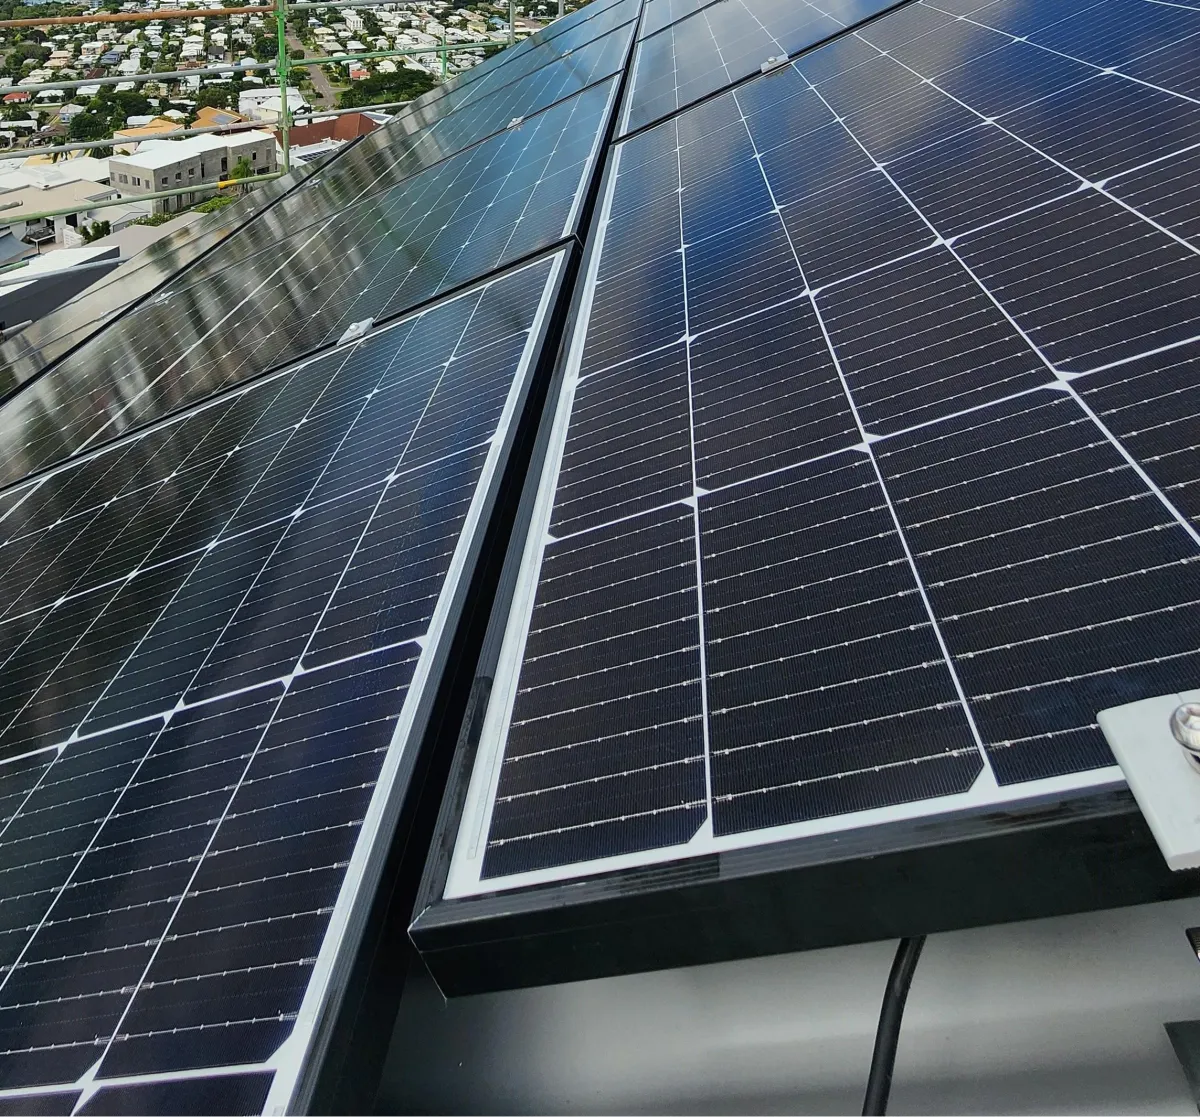
Solar. Electrical. Safety. Sorted.

Warranty
Solar Warranties Explained
Investing in solar systems requires a clear understanding of warranties to ensure long-term protection and value.
Solar warranties typically fall into three main categories:
Product Warranty (Equipment Warranty)
Covers:
Defects or failures in solar panels, inverters, mounting systems, and optimizers.
This warranty is only valid with the entity that manufactured the item.
Duration:
10-25 years for solar panels; 5-15 years for inverters.
Meaning:
If a manufacturing defect arises, the equipment will be repaired or replaced. External damage (e.g., severe weather) is excluded.
Common Issues Covered:
Physical defects: Cracks, delamination, glass breakage, hot spots
Connector failures: Faulty wiring or junction boxes
Internal electrical issues: Wiring faults, structural damage
Performance Warranty (Power Output Warranty)
Covers:
Solar panel efficiency or power output over time.
This warranty is only valid with the entity that manufactured the item.
Duration:
25-30 years.
Meaning:
Guarantees that panels won’t lose more than a specified efficiency percentage (typically 80-85%) over the warranty period.
Common Issues Covered:
Excessive power degradation: Faster-than-expected efficiency loss
Output mismatch: Underperforming panels
Premature efficiency loss: Early performance decline
Workmanship Warranty (Installation Warranty)
Covers: Installation quality and related issues.
This warranty is only valid with the entity that installed the system.
Duration: 1-10 years, depending on the installer.
Meaning: Protects against issues caused by installation errors, including improper wiring or mounting problems.
Important Considerations
Extended Warranties: Available for an additional cost.
Inverter Warranties: Typically shorter than panel warranties but extendable.
Transferability: Some warranties transfer if the property is sold.
Maintenance Requirements: Professional inspections may be required to maintain warranty validity.
Filing a Warranty Claim
If you suspect a warranty-related issue with your solar system, our experienced team can perform comprehensive testing to diagnose the problem. We’ll guide you through the warranty claim process, handling all necessary documentation and communication with the manufacturer for a hassle-free resolution.
Product Warranty Claim (Equipment Failures)
Photographs of damage or defects
Inspection reports from licensed technicians
Serial numbers and error codes (if applicable)
Electrical testing with multimeters or solar testers
Inverter diagnostic reports
Performance Warranty Claim (Power Degradation)
Power output readings and historical energy logs
Degradation test results (e.g., IV curve tracing)
Independent performance assessments from certified solar testing labs
Workmanship Warranty Claim (Installation Issues)
Inspection reports detailing installation faults
Photos showing improper wiring, mounting, or electrical issues
System performance logs highlighting recurring problems
System testing for voltage drops or incorrect wiring setups
Warranty Periods by Brand
Older or budget solar products often come with limited warranties, but you may still be eligible for coverage. Contact us for a system check, and we can investigate whether a warranty claim is possible.
Inverters
Sungrow: 5-10 years (standard), with optional extensions
GoodWe: 5-10 years (depending on model)
ABB/Power One/Aurora/FIMER: 5 years, extendable to 10 years
SMA: 5-10 years, depending on registration and model
Fronius: 5 years standard, with additional extensions
Other Brands (e.g., Solis, Sofar, Growatt, Redback): Typically 5 years
Solar Panels
Trina Solar: 10-15 years (product), 25-30 years (performance)
Canadian Solar: 15 years (product), 25 years (performance)
JA Solar: 12 years (product), 30 years (performance)
Solar System Monitoring
Online monitoring for solar systems offers real-time performance tracking, helping you maximize energy efficiency and savings. It alerts you to potential issues early, ensuring timely maintenance and reducing downtime. With access from anywhere, you can stay informed and in control of your system’s output and overall health.
Contact us today to help get you set up for monitoring
To connect to an inverter for monitoring, you'll typically need the following:
Inverter with Monitoring Capability
Ensure your inverter has built-in monitoring or supports third-party monitoring systems.
Wi-Fi or Ethernet Connection
A stable internet connection to allow the inverter to transmit data for remote monitoring.
Monitoring Device or App
Depending on the inverter brand, this could be a proprietary app or platform for accessing data.
Login Credentials
Username and password to access the monitoring platform.
Router or Gateway (if needed)
For inverters that require a dedicated gateway or communication device to bridge the connection to the internet.
Firmware Updates
Ensure the inverter’s firmware is up to date to avoid connectivity issues.
Network Setup Information
SSID and password for Wi-Fi, or Ethernet settings if connecting via cable.
Power Supply
The inverter should be powered and operational before connecting for monitoring.
Account Registration (if required)
Some monitoring platforms require creating an account to enable full access to system data.
Once these elements are in place, you can easily connect the inverter to the monitoring system for continuous performance tracking.
See our handy hints for common monitoring issues
How to Reconnect a Goodwe Inverter to Wifi
To reconnect Wi-Fi to a Goodwe inverter, you'll typically need to follow these steps:
Step 1: Reset Wi-Fi on the Inverter
Locate the Wi-Fi reset button on the Goodwe inverter. This is usually a small button near the Wi-Fi module or on the side of the inverter.
Press and hold the reset button for about 5-10 seconds until you see the Wi-Fi LED (usually blue or green) start flashing rapidly, indicating that the Wi-Fi has been reset and is in pairing mode.
Step 2: Connect to the Inverter’s Wi-Fi
Open the Wi-Fi settings on your smartphone, tablet, or laptop.
Look for a network name (SSID) that starts with "Goodwe" or similar, and connect to it. You might not need a password for this step, but some models may require one, which you can find in the user manual or on the inverter.
Once connected, your device may say that there’s no internet access — this is normal for this step.
Step 3: Configure the Inverter to Connect to Your Wi-Fi
Open a browser on your connected device and enter 10.10.100.254 into the address bar. This should take you to the Goodwe inverter’s Wi-Fi configuration page.
You will likely be prompted for login credentials:
Username: admin
Password: admin (These are default credentials; refer to your inverter’s manual if these do not work.)
On the configuration page, find the option to scan for Wi-Fi networks or manually enter the details.
Select your home Wi-Fi network from the list or enter the SSID and password.
Save the settings.
Step 4: Confirm Wi-Fi Connection
The inverter will attempt to connect to your home Wi-Fi.
Wait for the Wi-Fi indicator light to stop flashing and stay solid, indicating a successful connection.
Reconnect your phone or laptop to your home Wi-Fi, and check the Goodwe monitoring app (e.g., SEMS Portal) to confirm that the inverter is online.
Once connected, your inverter should start transmitting data to the monitoring platform as usual. If you still encounter issues, resetting both the inverter and the router can sometimes help.
To configure WiFi on a GoodWe inverter via the SEMS app, follow these steps:
1. Download and Install the SEMS App
Ensure you have the SEMS Portal app installed on your smartphone. It’s available on both iOS and Android platforms.
2. Create a SEMS Account
If you don’t have an account, open the SEMS app and create one using your email address or phone number.
After registration, log in to the SEMS app.
3. Connect to the Inverter’s WiFi
On the inverter, you’ll find a WiFi module (typically near the display).
Press and hold the WiFi button (or as per your inverter model) for around 5-10 seconds until you see a WiFi signal icon or light blink.
Go to your phone’s WiFi settings and search for available networks. Look for the network named something like "Solar-WiFi" or "GW_..." and connect to it.
Some models might use different names for their default WiFi. Check the inverter manual if needed.
4. Configure the WiFi Network in the SEMS App
Once connected to the inverter’s WiFi, open the SEMS app.
Tap the "Add Device" or "WiFi Configuration" option.
Input your inverter’s serial number (you can usually find this on a label on the inverter or in the app).
The app will scan and detect the connected inverter.
5. Connect the Inverter to Your Home WiFi
You will be prompted to select your home WiFi network from the available list.
Enter your home WiFi password.
Wait for the inverter to connect to your home WiFi. The app should show a message confirming a successful connection.
6. Complete the Setup
Once the connection is established, your inverter should appear on the SEMS app’s dashboard.
You can now monitor your system’s performance remotely via the SEMS portal.
If there are issues during configuration, ensure:
The home WiFi signal is strong enough where the inverter is located.
Your WiFi network supports the 2.4 GHz band, as some inverters are not compatible with 5 GHz networks.

Common Goodwe Inverter Error Codes and Meanings
GOODWE
E0 (Grid Abnormality)
Meaning: Voltage or frequency exceeds limits.
Action: Check grid voltage and frequency. Restart the inverter if conditions are normal.
E1 (Grid Voltage Too High)
Meaning: The grid voltage exceeds the maximum limit.
Action: Check local grid voltage and contact your utility provider if it’s consistently high.
E2 (Grid Voltage Too Low)
Meaning: The grid voltage is below the minimum limit.
Action: Check grid voltage and contact your utility provider if it’s consistently low.
E3 (Grid Frequency Too High)
Meaning: Grid frequency exceeds the maximum limit.
Action: Contact your utility provider to address the frequency issue.
E4 (Grid Frequency Too Low)
Meaning: Grid frequency is below the minimum limit.
Action: Contact your utility provider to address the frequency issue.
E5 (Island Protection)
Meaning: The inverter detected an islanding condition (isolation from the grid).
Action: Ensure that the grid is connected. Restart the inverter. Contact your Electrician.
E6 (Over Temperature)
Meaning: The inverter is overheating.
Action: Ensure adequate ventilation and check the ambient temperature. Allow the inverter to cool down before restarting. If issue persists, contact your Electrician.
E7 (DC Voltage Too High)
Meaning: The DC voltage from the solar panels exceeds the maximum limit.
Action: Contact your Electrician to safely check/adjust Voltage settings and/or adjust solar components.
E8 (Inverter Fault)
Meaning: Internal hardware fault.
Action: Restart the inverter. If the error persists, contact your Electrician for assistance.
E9 (Communication Error)
Meaning: Issues with communication between the inverter and the monitoring device.
Action: Check the connections and settings in the SEMS app. Restart both the inverter and the SEMS app. If issue persists, contact your Electrician.
How to Reconnect a Sungrow Inverter to Wifi
How To reconnect the Wi-Fi of a Sungrow inverter, follow these general steps:
1. Check the Inverter and Wi-Fi Module
Ensure the inverter is powered on.
Check if the Wi-Fi module (usually a dongle or integrated module) is securely connected to the inverter.
2. Reset the Wi-Fi Connection
Press the Wi-Fi reset button on the inverter or Wi-Fi module. This button is often labeled as “WLAN” or “Reset.”
Hold the button for about 5-10 seconds until the indicator light starts flashing, signaling that it's ready to reconnect.
3. Connect to the Inverter's Wi-Fi
Open your smartphone or laptop, and go to Wi-Fi settings.
Look for the inverter’s Wi-Fi signal. It’s usually named something like SG-WiFi-XXXXXX.
Connect to this network. The default password is often provided on the inverter or in the user manual.
4. Access the Web Interface or Use the App
Once connected to the inverter’s Wi-Fi, open a web browser and go to the address 10.10.100.254.
Log in using the default credentials (commonly admin for both username and password, or as listed in the inverter’s manual).
Alternatively, you can use the Sungrow iSolarCloud app to configure the Wi-Fi connection.
5. Reconnect to Your Home Wi-Fi
In the inverter's web interface or app, navigate to Wi-Fi settings.
Select your home Wi-Fi network and enter the Wi-Fi password.
Save the settings and allow the inverter a few moments to reconnect to your home network.
6. Confirm Connection
Once reconnected, the inverter's Wi-Fi indicator light should be solid (not blinking).
You can confirm the connection by checking the inverter status in the Sungrow iSolarCloud app or by logging into the iSolarCloud portal.
If you're still having issues after these steps, reboot both your router and inverter, and try again.
Common Sungrow Inverter Error Codes and Meanings
SUNGROW
0A - No Fault
The inverter is functioning normally.
0B - Grid Voltage High
The voltage from the grid is higher than acceptable limits. Contact the utility provider if the voltage remains consistently high.
0C - Grid Voltage Low
The voltage from the grid is lower than acceptable limits. Contact the utility provider to check for issues on their end.
0D - Grid Frequency High
The grid frequency exceeds the maximum allowed frequency. Confirm the grid frequency by contacting your electrician to assess, or via monitoring system. If consistently high, report the issue to the utility provider, as this could indicate an issue with grid stability
0E - Grid Frequency Low
The grid frequency is below the minimum allowed frequency. Contact your Electrician to measure the grid frequency. Contact the utility provider if the frequency is consistently below the allowable range.
10 - Isolation Fault
There is an issue with the isolation monitoring, indicating potential grounding problems. Contact your Electrician for assistance and testing.
11 - PV Voltage High
The voltage from the photovoltaic (PV) panels is higher than acceptable limits. Contact your Electrician to assess the issue and adjust where necessary.
12 - PV Voltage Low
The voltage from the PV panels is lower than acceptable limits. Contact your Electrician to conduct a system Health Check to determine the cause.
13 - Over Temperature
The inverter is overheating, potentially due to insufficient ventilation or ambient temperature issues. Ensure the inverter has sufficient ventilation and is not exposed to direct sunlight or heat sources. Allow to cool down and then restart. If issue persists contact your Electrician.
14 - Communication Fault
There’s an issue with communication between the inverter and the monitoring system. Restart the Modem and inverter. If the issue persists, please contact your Electrician to complete a check and firmware updates where necessary.
15 - Over Current
The current level exceeds the allowable limit, which may indicate a fault in the system. Contact your Electrician to investigate.
20 - Inverter Fault
There is a malfunction within the inverter itself, Restart the inverter and monitor for recurrence. If the issue remains, contact Sungrow support or your Electrician for a detailed diagnosis and repair.
21 - Overload Fault
The inverter is overloaded, typically due to excessive power draw. Contact your Electrician to diagnose the issue.
22 - DC Injection Fault
There is an issue with DC voltage leaking into the grid, which can be dangerous. Perform the shutdown procedure and contact your Electrician for assistance.
23 - AC Relay Fault
There may be a problem with the AC relay operation within the inverter. Restart the Inverter and see if the fault clears. If the issue persists, contact your Electrician. Relay faults are generally a permanent fault and will require the inverter to be replaced.
24- Under Voltage
The output voltage is lower than the minimum allowable level. Contact your Electrician to assess Inverter and system voltages, and then your Utility provider if the grid voltage is low.
Reconnect a Fimer/Aurora/ABB Inverter to Wifi
To reconnect WiFi for a Fimer inverter, follow these general steps:
Locate the WiFi Reset Button:
On the inverter, find the WiFi module or look for the “WiFi Reset” button. The location of this button can vary by model, so refer to the user manual if necessary.
Reset WiFi Connection:
Press and hold the WiFi reset button for about 5–10 seconds. The inverter’s WiFi module should reset and go into a configuration mode (usually indicated by a flashing light).
Connect to the Inverter’s WiFi Network:
On a smartphone or computer, go to your WiFi settings and look for a network name (SSID) that is related to Fimer or Aurora, like “FIMER-WiFi” or “Aurora-xxxx” or ‘ABBxxxx”.
Connect to this network. You may be asked for a password (the Product Key or PK), which is usually printed on the inverter or available in the manual.
Access Configuration Portal:
Once connected, open a web browser and enter the IP address for the inverter’s WiFi setup page ( 192.168.117.1).
This should load the inverter’s configuration portal.
Use your Aurora vision Log in details to log in
Select Your Home WiFi Network:
In the configuration portal (Auroravision, or Energy Viewer APP etc), find the option in menu for network settings, and select the option for WLAN settings.
Select your home WiFi network and enter the password.
Reconnect and Verify:
After saving these settings, the inverter should reboot or confirm that it's connected. Go back to your device’s WiFi settings and reconnect to your home network.
Confirm Connection:
Log in to the Fimer monitoring app or web portal (if you’re using one) to confirm that the inverter is reporting data online.
Connecting a Solis Inverter
Steps to reconfigure Wifi
Connect your phone, tablet, or laptop to the Wi-Fi network broadcasted by the data logger.
You should be able to find the device SSID as letters followed by numbers which will match the Datalogger serial number (small black stick coming out from underneath the Inverter).
Open a browser. In the URL bar, enter the IP address 10.10.100.254. In most cases, a window will open asking for a username and password.
Please enter Username: "admin" and Password: "123456789." (some may require password ‘admin’)
When the page opens, click on "Wizard."
Please search for your home network here and then click next.
Enter the Wifi router’s password and click next.
It may take a few seconds for the logger to finally be configured with your home network
Once complete click Ok.
If the connection to the data logger cannot be established, the following should be checked:
- The 2.4 GHz network should be used, not the 5 GHz network.
If the logger cannot be found by serial number, press the reset button for 10 seconds.
If never added before to a plant on Solis Cloud
Add your datalogger serial number manually onto your plant on the Monitoring Platform - www.soliscloud.com or by scanning the QR code on the logger via the App.
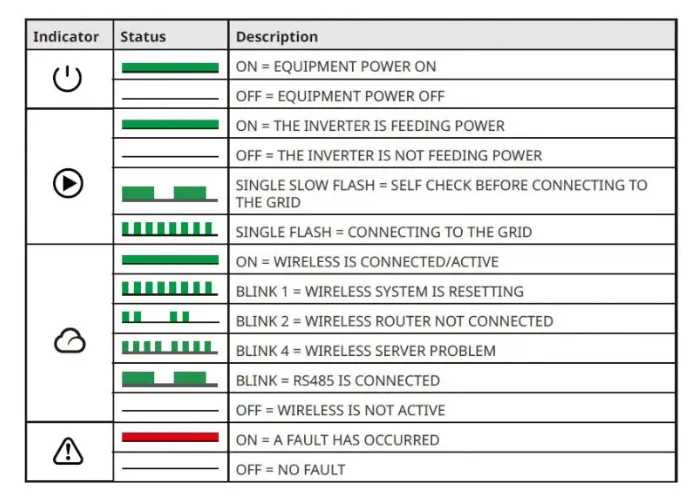
What do my Inverter Lights mean?
Different solar inverters have varying indicator light systems, with each make and model using its own set of colors, patterns, and sequences to communicate specific statuses or issues.
While one brand might use a solid green light to indicate normal operation, another might use a flashing green or even a different color entirely.
Similarly, warning or error states could be represented by red, orange, or even combinations of blinking lights, with each pattern signifying a unique issue, such as grid faults, low performance, or connectivity problems.
To accurately interpret what the lights on your specific inverter mean, it’s essential to refer to the manufacturer’s user manual or documentation. If you're uncertain, have a look below, or give us a call to assist.
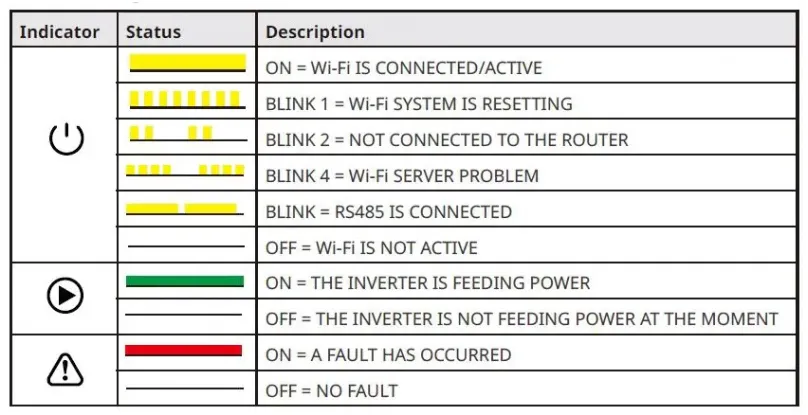
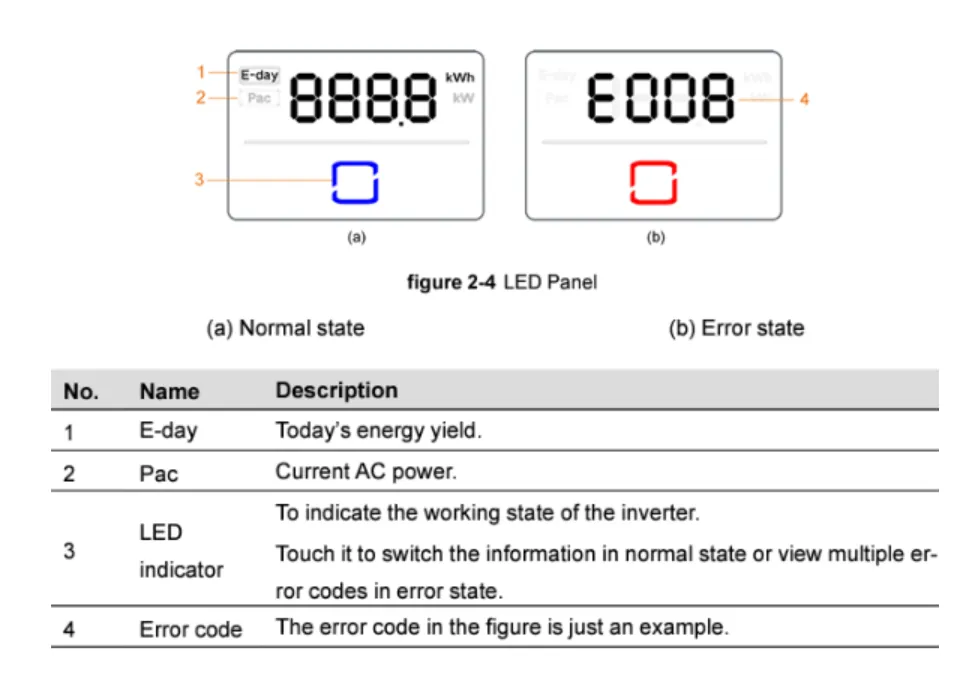
GOODWE LED Lights on models with NO LCD screen
GOODWE LED Lights on models with LCD screen
SUNGROW - newer models
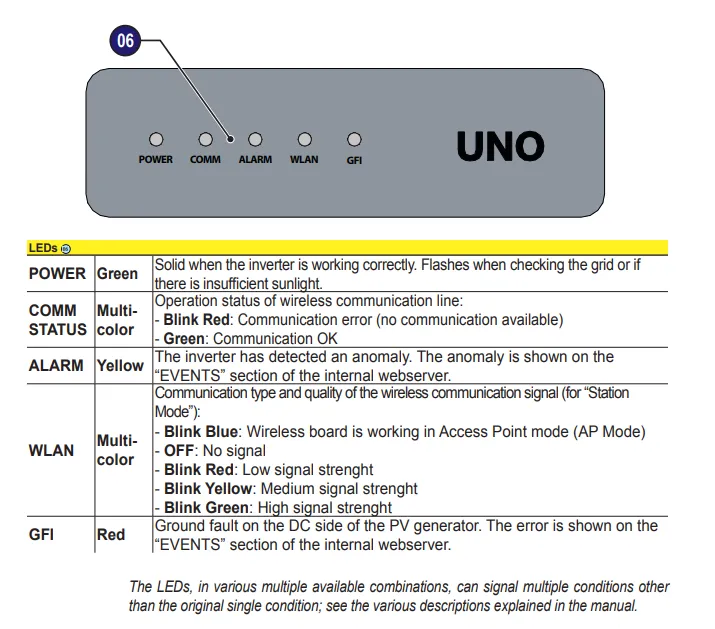
FIMER/ABB/AURORA/POWER ONE
LED signals of SMA inverters
The green LED is flashing (two seconds on and two seconds off)
Waiting for feed-in conditions The conditions for feed-in operation are not yet met. As soon as the conditions are met, the inverter will start feed-in operation.
The green LED flashes quickly
Update of central processing unit. The central processing unit of the inverter is being updated.
The green LED is glowing
Feed-in operation. The inverter feeds in with a power of at least 90%.
The green LED is pulsing
Feed-in operation
The inverter is equipped with a dynamic power display via the green LED.
Depending on the power, the green LED pulses fast or slow.
If necessary, you can switch off the dynamic power display via the green LED.
The green LED is off
The inverter is not feeding into the utility grid.
The red LED is glowing
Event occurred
If an event occurs, a distinct event message and the corresponding
event number will be displayed in addition on the inverter user interface or
in the communication product (e.g. SMA Data Manager)
The blue LED flashes slowly for approx. one minute
Communication connection is being established
The inverter is establishing a connection to a local network or is establishing
a direct connection to an end device via Ethernet (e.g. computer, tablet PC or smartphone
The blue LED is glowing
Communication active There is an active connection with a local network or there is a
direct connection with an end device via Ethernet (e.g. computer, tablet PC or smartphone).
Our Trusted Brands


Our Network Partners


Book your Inspection Today!
Ready to keep your solar system running smoothly or tackle that electrical project? Complete our booking form today, and our expert team will get you sorted with reliable, hassle-free service!

Details Define Us
Precise and creative solutions.

Extraordinary Care
Honesty and transparency.

Exceptional Standards
Top-notch products and services.
FOLLOW US
COMPANY
CUSTOMER CARE
QUICK LINKS
Copyright 2026. Z*** VanAyr Pty Ltd t/a Bonato Electrical. ABN: 39 648 590 032. All Rights Reserved.